
Drawing the Rosette of Islamic Geometric Art. Part 1- The Basic Structure
It all begins with an idea.
Ameet Hindocha, Alan D Adams, 2023
[Printing: See note at the bottom of this section]
The rosette motif in Islamic geometric art is quite distinctive. The designs appeared somewhere around the Caspian and Black seas over 1000 years ago. One of the remarkable things about this family of designs is that almost all of them share the same system of proportions. Those proportions appeared in the first patterns and have remained unchanged across those 1000 years.
The best discussion of these available to us records Anthony J Lee’s explorations beginning in the 1960s. Ameet Hindocha and Alan Adams are periodically offering a set of courses at The Kings Foundation; School of Traditional Arts to teach the foundations of this family of designs based on Lee’s explorations. This page is a summary of Part 1 course as a refresher or as an introduction for students joining the series who missed Part 1.
The course is based on AJ Lee’s notebooks from the 1975-85 (1) and a clear outline of the method in his paper on the more general topic of tiled star patterns in Muqarnas from 1987.(2) The first set of sessions introduced the terms for discussing (the nomenclature), the arrangement of rosettes we would use (the tiling), and the specific methodology for creating the desired proportions. This page reviews each of these subjects for an example rosette. The discussion attempts to demonstrate the surprising fact that almost all rosettes are basically the same layout, applied to different divisions of the circle. The 8 point, 10 point, and 12 point rosette were studied as parallel and tapered layouts.
Part 1
The first step in discovering the detail structure of the rosette is, unfortunately, a language lesson. There is no discussion of “mathematics” here but there are new terms to learn; there is a language lesson.
Studying offline: Printing from a Squarespace websites is a problem. I do plan to deal with that by making a print friendly document when time becomes available.
(1) tilingsearch.org has a permanent link to Lee's Notebooks. Typed transcripts can be found Here
(2) A.J. Lee, Islamic Star Patterns, Muqarnas, Vol. 4 (1987), pp. 182-197. This paper is available from Archnet Here.

Fig. 2. The Rosette and its Parts.
The center Star 2 in Fig 2, as a unit, is what is called the Rosette in the Islamic geometric tradition. It has several specific properties, but to talk about it we need to name its parts. Star 1 on the left of Fig 2 is identical to the center element of the rosette. It has a standard name; Star 1 is a star polygon. In essence it is a polygon with pointy projecting parts. These are named for their rotational symmetry, 10 fold in this case, and their connectivity between points. Curiously, mathematicians count from zero. Star 1 is a 10 fold / 0 to 3 star, written {10/3}. The left side of Star 3 is a composite figure as it occurs in the rosette. The central {10/3} star polygon is surrounded by shape 2 as it would be in a rosette. The isolated shape 2 is called a kite or “almond”, for obvious reasons, in almost all languages. Persian is an exception where is is called the “bergamot”, turanj. Rosettes typically have the structure shown in Star 2 where a star polygon is surrounded by almonds, or kites, which are in turn surrounded by elongated hexagons. In some cases, less commonly, the center star polygon is of the type shown labeled 4 in Star 3. In this case with two of these lines erased and we get a new star polygon, as shown in half view at 4 in star 3. This is a {10/4} star polygon.
A classic rosette will have strict rotational symmetry equal to the number of arms if it is viewed in isolation.
Note: Terms which appear in italics are defined in a glossary at this link.
[Optional Information. Stars 1 and 3 are also called “concave polygons.” Here and in other cases, wikipedia is a good source for more information.]

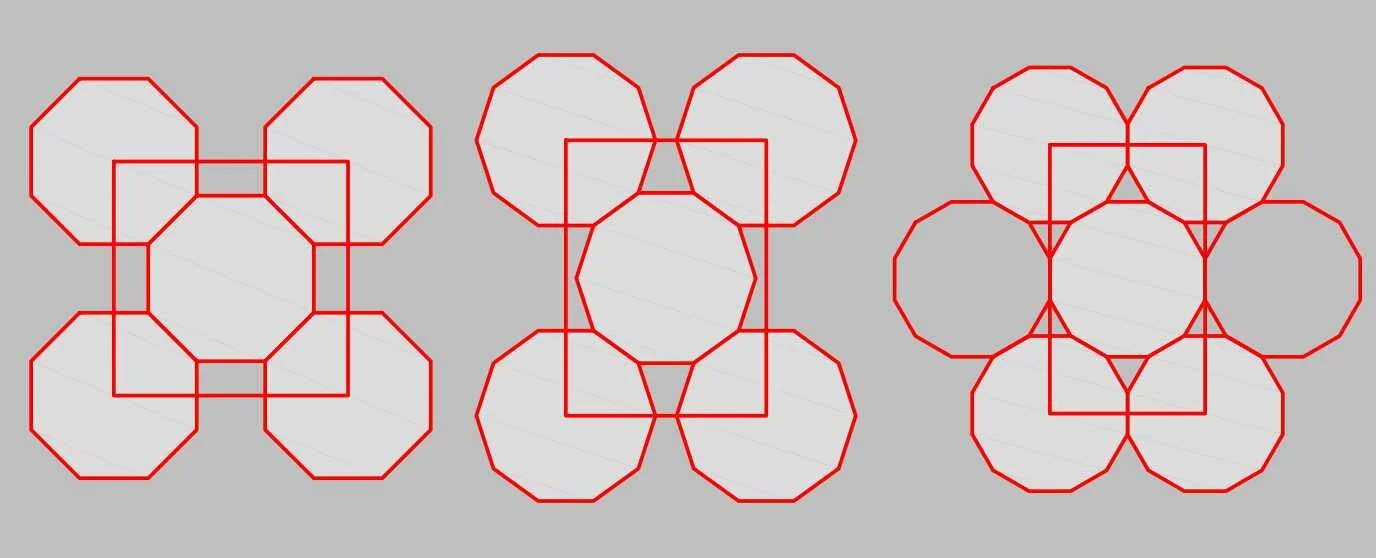
Fig 3. Multiple Rosettes, Tiled
Isolated rosettes are not terribly common. They are most often part of repeating patterns, also known as tilings. A very important feature of the ideal proportions of the rosette is only clearly shown in tilings. As a result, studying its behavior in these tilings is important. This document will not teach the subject of tilings separately. Tiling is a large complex subject but we will only touch on examples here. In general, you need to recognize the results of- rather than deal with the theory of- tiling.
The first set of patterns studied in part 1 of these course are all related to Fig 3. Four rosettes will surround a center rosette with the rosettes touching, sharing a single point, at the tip of a hexagonal petal. The details of tiling are different for each different symmetry: 8 fold, 10 fold, 12 fold etc. but we will emphasize the common themes as we study the interplay of the rosettes.
The red layout drawing on the right in Fig 3 is not really a tiling. It is simply the layout circles drawn in contact. Space remains open between the layout circles and pattern lines extend into these spaces between the circles. A proper tiling will bring all of these pattern lines inside one or more tiles. The two simplest proper tilings for the pattern in Fig 3 appear in Figure 4. True tilings as in Fig 4 will have other important properties which will help in designing patterns but we will learn about these as we go rather than approaching it as a separate subject.

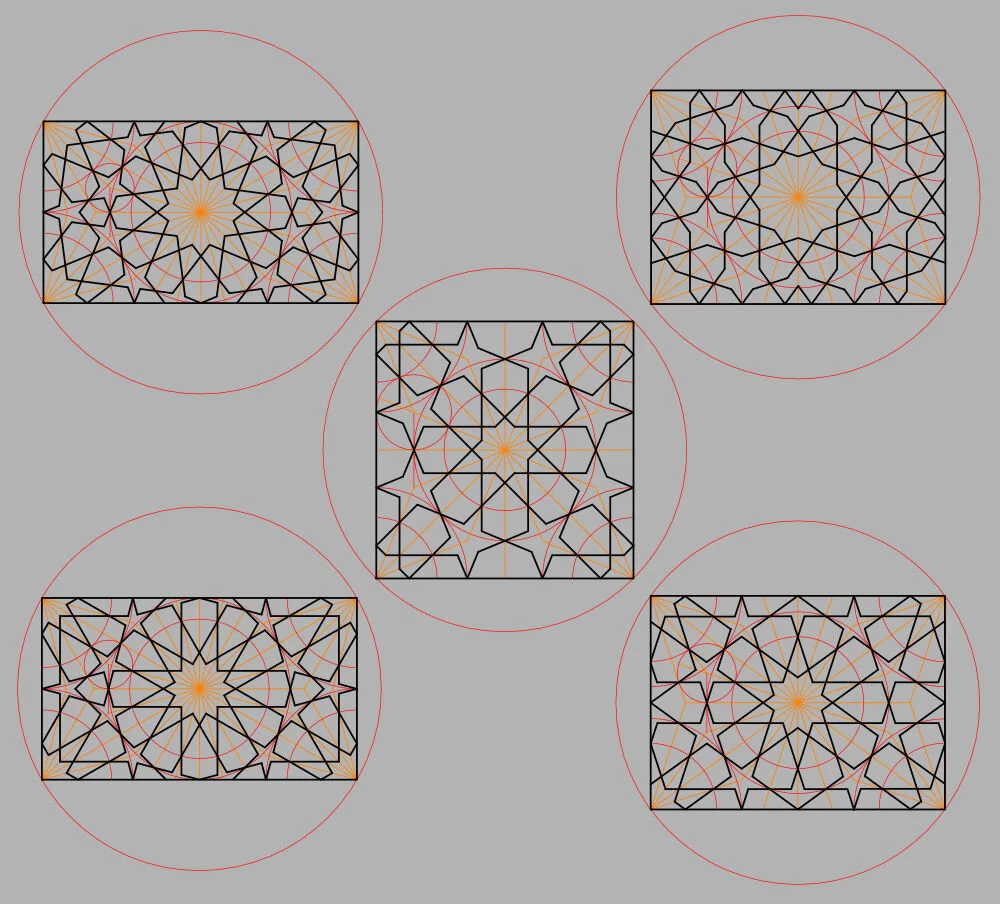
Fig. 4. Tilings
Tilings 1, 2 and “Not a Tiling” 3 in Fig 4 are the same pattern divided into different divisions to emphasize different aspects of the pattern. Tiling 1 uses two tiles. One tile is the decagon which surrounds the rosette. This tiling is useful for emphasizing the key role of the rosette. One petal of the rosette touches the center of each face of the polygon. Note that the large polygon of tiling 1 and everything inside this tile has perfect rotational symmetry identical to the rosette number- 10 fold in this case.
Tiling 2 uses a single tile. This is how most people will think of tiling. The surface is tiled perfectly, without gaps, by the one tile. This tile has greatly reduced rotational symmetry. It can only rotate 180º to give an identical pattern for 2 fold rotational symmetry.
“Not a Tiling” 3 shows a different aspect of the structure. Gaps remain between the circles, so this is not a tiling. It is an imperfect circle packing. These circles define layout elements of the pattern below the level of the rosette. This particular layout is absolutely key to understanding the proportions of the rosette and why one set of proportions is considered ideal.
Nomenclature- Labels
To talk about the rosette efficiently, to take advantage of Lee’s thoughts and the discussions in his notebooks, we will need to be able to refer to points around the structure by some labels which will remain constant throughout our explorations. One wants to have one system which people can agree on so we will use an existing set of labels used by Anthony J Lee in his published notes and his paper discussing the Islamic Star Patterns. Lee’s nomenclature varied across his studies. To follow the discussion through all of his notebooks we need to modify the notation of the notebooks slightly to use consistent labels throughout.
The following figures from his notebooks are the early figures which define the basics needed to discuss the subject. They are redrawn here with new labeling and some added notes. The figure numbers are Lee’s. These figures through, Figure 15, can be studied with the text of Lee’s notebooks to get a good understanding of the basics. Some new figures have been added as addenda to point out how Lee’s labels apply to the circles we will use. Lee did not have a specific drawing method. The notebook figures are constructed with protractors. As a result we will need to insert discussions of our compass construction methods as we go along.
These modified figures are added into the flow of the notebook 1 discussion in this document for study. We have tried to stay as close as possible to Lee’s notation and descriptions -while changing the notation to be consistent throughout- to make the best use of his considerable base of knowledge.
The foundation figures are shown here for use in this discussion.


The best way to see the importance of these rules and elements is to follow their role along in the creation of a rosette pattern. The parallel armed 10 point rosette serves well. We start all of these studies with a layout which will allow us to draw 5 rosettes, 4 quarter rosettes around a center, in a pattern where they touch at the tips of their petals. These are the “closest tiling” of the rosette.
This tiling is chosen to highlight the importance of the pattern elements formed by the tiling, outside of the strict definition of the rosette. It will also show why there is a “best” or “ideal”set of proportions for the rosette. It will take some time to get to the important part, but this is a lesson plan to review all of the steps of the layout.
The following series of steps takes the layout from the divided circle through to the finished pattern. Each step is annotated with the contribution of each element to the final result.
Layouts 1. Drawing the Basic Tilings. 8 Fold, 10 Fold, 12 Fold
The same tiling is used to discuss all three of the rosettes, 8 fold, 10 fold, and 12 fold. The results look different due to the interactions of the rosette symmetry with the chosen tiling. As we move down this series, the shape and size of the spaces between rosettes changes. This will have some very interesting results.

Layout 2. Divisions of the circle for 5 star centers
The first step in any pattern is dividing a circle. This tiling can use a single divided master circle to lay out all of the elements. These basic layouts are generally useful for a huge number of patterns so they are covered in separate videos at these YouTube links for the 16 fold divisions, 20 fold divisions and 24 fold divisions for the 8, 10, and 12 rosettes respectively.
The largest circle is the master circle for the pattern and all of the dividing work is done there. Larger is usually better for accuracy. This one is 20 fold divided for a 10 fold rosette. Rosettes always use 2n divisions of the circle, where [n] is the symmetry of the rosette.
The rectangle for the tiling discussed above is drawn in and then each corner and the center are divided. The two inter-radii on each side of the diagonals define points [P]. Points [P] are the first critical points for this layout. Connecting the two intersections [P1] and [P2] defines point [a]. Point [a] defines the size of the outer circle of each rosette. Circle [oa]

Layout 3
The points [P] also define the peripheral polygon of the rosette. Two short arcs to define the missing vertices of the decagon would be required to draw it here. We usually do not need to draw the polygon, but we need to understand its role in the pattern structure.

Layout 4
The space inside the decagons will be filled by the rosette with perfect 10 fold rotational symmetry, but the remaining space, a bow tie shaped concave tile here, will be filled by extending the rosette structure outside the decagon

Layout 5
All three symmetries have similar layouts. The two inter-radii define points [P] and the points [P] define a polygon with the same symmetry as the rosette.

Layout 6
The simplest perfect tiling of this pattern uses a hexagon. This is defined by extending the lines through the points [Px] ( Lines [P1 P2], [P4 P5], [P6 P7], [P9 P10] ) until they intersect and then completing the missing vertical sides of a hexagon

Layout 7
We can now draw all of the proportioning elements of the rosette. The first circle at the peripheral point [P1] with radius [P1 a] is the critical proportioning circle. Circle [P1 a] defines point [b] on the radius [oP1] which defines [P1]. Circle [ob] is drawn, circle [oa] is drawn. These three circles completely define the proportions of the rosette. These proportions are found in the overwhelming majority of historical examples. It will not be clear why until later.

Layout 8
Point [P1] and [P2] sit on the vertices of the touching peripheral polygons of the rosette layout. The polygons are all identical here and share sides of equal length. The circle [P1 a] defines the proportions at both rosette centers. The polygons do not all need to be the same to use this method but we will only get to those patterns after developing the basics.

Layout 9
The general solution of the rosette requires one more step. A bisector must be constructed. The step uses [P1] and [P10]. The angle formed by the side [P1-P10] and the radius [oP1] which defines [P1] is bisected. This can be bisected as for any other angle but the polygon sides usually define the point you need. Just remember that the point is on the blue polygon circle [oP] and not the rosette circle [oa]. This bisector will be used to define the relationship between the sides and the ends of the peripheral hexagonal rosette petals.
[All of the defining points of the rosette will have 10 identical positions around the rosette; I number clockwise. ]

Layout 10
If we remove all of the labels and extra lines used in the discussions, this is the minimal layout to completely define the rosette pattern we will draw. We will use everything in this drawing and, technically, we will not need more.

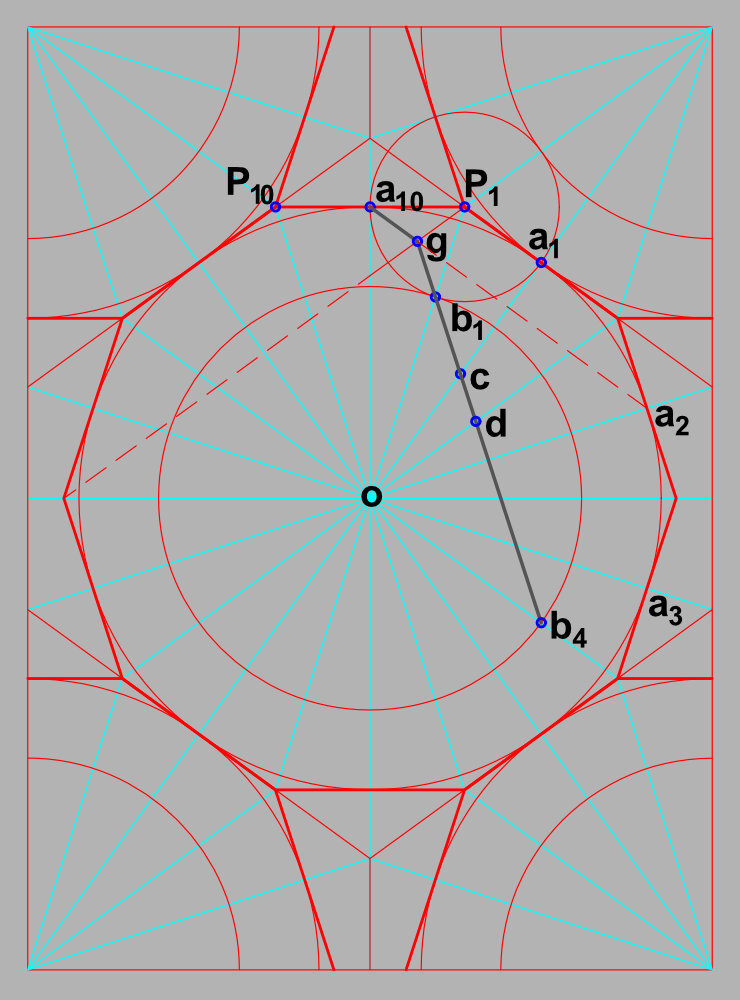
Layout 11
All of the foundation work is done. Adding a single line now defines all of the proportions of the rosette pattern lines. In this case, we add a line to define the petals of the rosette from [b1] to [b5] . This will define petals with parallel sides.
We usually say that the ends of the petals are now defined by a decagon but that is not generally true. It is true only for the parallel arm rosette. Extending the line [b1b5] up defines point [g] on the bisector which we just constructed. What defines the ends of the petals in a completely general definition is the line drawn from [a10] to [g]. In this parallel petal case, a straight line drawn from [a10] through [g] continues to [a1].

Layout 12
Comparing this layout to Lee’s figures where he labels and defines the key points of the structure, we now have this.

Layout 13
To complete the pattern we draw a star polygon as shown using circle [ob]. In this parallel case, we only need one circle. A tapered case shown at the end of this summary will show the general case where two circles are needed to define this star polygon.
The lines of the star polygon are extended out to meet the ends of the petal defined here by the decagon.

Layout 14
The center rosette is complete and some of the petals of the quarter rosettes in the corners can be drawn by reaching across the pattern for extra defining points. This, again, only works well in the parallel case. In general, we will need more layout structure in the corners.

Layout 15
The extra layout definition we need is circle [oc]. This circle is defined by the same line [b1 b5] from Layout 11. This layout now defines all but 8 short lines around the outside of the pattern.

Layout 16
Extending the original circles [oa], [ob], and [oc] to meet the first master layout circle creates enough layout structure to define all of the lines around the outside of the pattern without approximations or use of secondary pattern lines many steps removed from the original layout. The closer a point is to the original layout circles, the more accurate it is likely to be.
We now have only the space defined by the second tile type to fill. These grey tiles define the space outside the original decagon of the rosette. They are filled by extending pattern lines to intersect the hexagon tiling boundaries. For this rosette, no other decisions are needed.

Layout 17
The completed pattern with all layout. Layout 18 below, just the pattern space.

Layout 18

Layout 19
This is the first point where we can see the reason for the definition of the “ideal proportions” of this rosette. If we look at the circle packing version of the pattern we see ten tangent peripheral circles, [P(n)a(n)], tangent around the center circle [ob]. In each of those peripheral circles we have perfect symmetry pentagram stars formed by the tiling interaction of the center star polygon. The center star polygon is itself a pair of overlapping pentagrams. No other set of proportions for the peripheral stars and a center star polygon will give this result. This is the archetype for all rosettes except the sixfold.
[The sixfold rosette results in sixfold peripheral stars. The ideal proportions are established by an identical approach and the discussions otherwise very similar]
Layout 20
Some other remarkable results fall out of this definition. Polygons (in orange) are formed in the bowtie tile space around the rosette, defined as the space between the stars. These are not independently constructed. They are results of tiling interactions. Remarkably, those interactions create a hexagonal petal exactly congruent to the petals of the rosette.

Layout 21
If we look at the pattern centered on these resultant polygons, another new type of figure is quite obvious. It resembles a bird in flight, or a swallow. This three point polygon result is formed by the imperfection in the circle packing and the overlap of two five point stars. Draw them out and study the strategy used to resolve the conflict. This type of problem arises more and more often as more complex patterns are studied.

Layout 22
Similar peripheral stars are created in all of the rosette tilings above sixfold. Use of the proportions described here, and only these, give the best possible symmetry for these stars. In all but the 10 fold rosette, they are a compromise star. All star arms are of equal length, but the angles cannot all be equal. The stars then have two fold reflection symmetry and fan symmetrically about the new polygon formed in the tiling.
The stars sit in the peripheral circles of the circle packing (see Fig 4, Layout 19) and between those stars, a second type of “resultant” polygon is created. The changing shapes of the spaces between the defining circumscribing polygon of the rosette result in very different figures, but the general description is the same. They are often completely defined by the tiling but sometimes they also offer choices to the artist, as we will see in some later examples.
Tapered Rosettes. See Fig 15 of Lee.
One other aspect of the basic layout was explored in the first set of lessons. A very simple change to the choices of pattern construction creates tapered petals in the rosette. A single change in the early sequence of steps is needed. Applying the same method from then on creates a tapered rosette. They use all of the same layout structure and steps and their final structures are very similar.
Layout 23 Taper
The structure of the tapered rosette revolves around geometry defined at point [g]. This sequence picks up the construction at Layout 11. In Layout 11, the line [b1-b5] was vertical. The line spanned 8 divisions (4 radii and 4 inter-radii). This created a {10/4} star polygon in the center. The {star polygon name} only counts radii. In this tapered examples, [b1-b4] spans 6 divisions, (3 radii, 3 inter-radii.). The resulting center star polygon will be a {10/3} star polygon.

Layout 24
In this discussion, the definition moved from point [b4] to point [b1] and then up to point [g] at the bisector intersection. Point [g] defined the slope of the line [ga]. Note that we could have gone the opposite direction. If we defined the slope of line [ag] first, the line [gb1] would then define the inner star polygon. This is the key role of point [g] and we will see it when unlike symmetry rosettes interact.
To continue or construction we use line [b1b4] to define new layout circles [oc] and [od].

Layout 25 Taper
The circle [ob] and circle [od] define the inner {10/3} star polygon shown. We can draw this by using the layout points [b1] and [b4] and drawing the pattern line stopped at [d] or we can use the two layout circles [ob] and [od].

Layout 26 Taper
Two pentagrams overlap to create the center of the pattern. A practical problem arises in knowing where we stop the extended line outside of circle [ob]. The end point is only defined at [g]. A housekeeping layout circle can be used by striking a circle through [g]. We can now stop our pattern lines at this circle and get a neat pattern drawn when we fill in the petal ends.

Layout 27 Taper
We skipped several steps to arrive at this finished pattern since they are identical to the parallel example. The same issue arises with needing extra layout definition in the corners. It is solved the same way. A new issue arises if we finish the pattern as drawn.
If we finish the pattern as shown, as it was drawn in the class session, by continuing the pattern lines to the rectangular tile boundary at the bottom, we do not have sufficient layout to complete the rhombus at the sides. An auxiliary circle is used in case such as this. Its radius is taken from the bottom half rhombus and added in at the sides to supply the required intersection.

Layout 28 Taper
The results in the space between the rosette polygons is similar but more complicated compared to the parallel rosette case. A new hexagon identical to the rosette hexagon is created in the bowtie shaped space. New perfect pentagrams are created by the interaction of three tiles. These do not have a {5/?} name. They are only defined from 10 fold divisions.
A new shape and a rhombus were created by extending the pattern in the center of the bowtie shaped tile.

Layout 29 Taper
This is a legitimate completion of the pattern but the rhombus pattern line does cross over the decagon tile boundary in the center. It creates a somewhat untidy tiling result and the rosette space no longer has perfect 10 fold rotational symmetry. This is an intellectually irritating result but it is easily fixed.

Layout 30 Taper
This untidy tiling result is easily avoided by completing the center as shown. A somewhat unattractive shape results, but the tiling is “purer”.
One Triangle to Rule Them All.*
We studied rosettes patterns based on eight fold, ten fold and twelve fold divisions of the circle. We looked at both parallel armed and tapered rosettes. It is always fun to learn to draw new patterns, or to draw known patterns more elegantly, but there is a larger message here. The important message of the five classic rosettes patterns studied here is that the rosettes all share an identical underlying structure. The proportions of the various parts of the rosette are established by identical methods. The only real differences are created by the number of divisions of the circle used and a single decision which defines circle [oc].
All of the closest tilings used here create both five point stars and secondary “resultant” polygons through tiling interactions. These five point stars in the closest tilings are results, not free choices. The new resultant polygons are created by the tilings and completely defined in these simple examples.
We can highlight this unity by looking at what happens in a specific triangle which is created in each pattern. AJ Lee heavily emphasizes the structure we are about to discuss due to the very important role it plays in understanding more complex rosette patterns. He calls this the collateral triangle after its structure where it occurs in a specific rhombus analysis. We will call it the minimal triangle in this context, the smallest triangle unit containing all of the structural information needed to define a pattern.
The review of the method above used the tenfold division due to its resulting perfect symmetry. It is easier to start the discussion of the minimal triangle at the rosette of the eight fold division.
*Bad movie / book reference joke

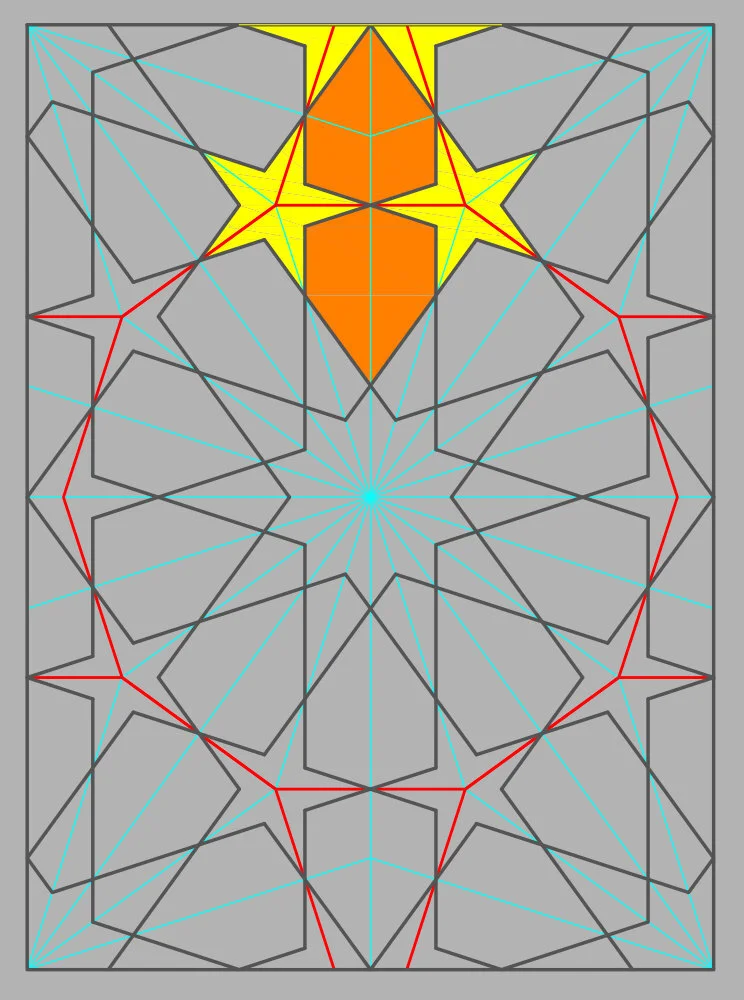
Layout 31
If we look at the colored section of the 8 point rosette pattern, triangle [o-CR-o’], we have exactly one eighth of the pattern. This triangle could be repeated and rotated to create the entire pattern. It is a complete tile. We can further divide this into the smaller yellow and orange triangles. The orange triangle [o’-a1-CR] is the exact reflection of the yellow triangle [o-a1-CR].
This now means that everything in this pattern is completely defined within the yellow triangle; it is the minimal triangle.
If we look at all of the critical points we defined, they all lie on or within this minimal triangle. The critical proportioning circle [Pa] is the incircle of this larger triangle [o-CR-o’].
Note that the five point star, created by the tiling, is a central element of this analysis. We can see and control it easily in this layout. This will become very important when we move to more complex layouts where [o] and [o’] have different symmetries.

Layout 32
So why is the new point labeled [CR]? This is the center of an alternate way to view the pattern which emphasizes the role of the minimal triangle; it is the Center of the Rhombus tile.
A square is a special case of a rhombus. A rhombus has all sides equal length and opposite angles equal.

Layout 33
Why did we start with 8 point symmetry for this part of the story? Because it is a more complex story for 10 and 12. We see exactly the same triangle structure, applied to the different symmetry divisions, in yellow and orange. Unfortunately, repeating and rotating these triangles does not create the complete pattern. We need a second triangle in these cases, as shown on the next page.

Layout 34
A new point [h] is labeled to define a second triangle [h-CR-o’] We can now create the entire pattern using these three triangles. A more complex story but everything which held true for the 8 fold symmetry triangle [o-CR-o’] is true for the triangle [o-h-o’] as well. In the 10 fold symmetry case, [o-CR-o’] is a more complex story which we will get to later in our explorations of Lee’s methods.
Summary

Layout 35
This first part of a discussion of a methodical approach to the rosette and its structure used five very closely related patterns. They are all tilings of 5 touching rosettes, no rosette overlaps its neighbors.
The set is chosen for some specific reasons. It shows that all of the patterns use identical layouts, modified by their interaction with the divisions of the circle.

Layout 36
All of the patterns were drawn in the same divided circle. The spacing of the four corner rosettes were determined by the closest possible placement of four without overlaps. (See layout 1). This is the first effect of the divisions on the appearance of the final pattern.

Layout 37
The basic structure of our patterns is the same as any pattern of tiled stars. We find the point where the stars touch. In this case, they are all identical and meet in the mid point of the chosen corner radius. The four lines drawn here are the shared sides of two tiled polygons.

Layout 38
The entire point of this discussion is found in the three circles drawn in next. These layout circles are determined by (1) the inscribed circle of the polygon and (2) by the small, critical, layout circle in the top right quadrant. This single circle determines all of the proportions of the rosette. This is a complete definition of the structure, requiring only one decision from the artist at this point. There is a further fun fact about the power of this layout, but that come later.

Layout 39
The single decision needed from the artist to draw the patterns use here is how the arms, or petals of the rosette will taper. We started with parallel armed rosettes.

Layout 40
Three very different and very similar patterns result from a single layout method.

Layout 41
The second set of pattern used a layout which resulted in tapered rosette petals. This shows all of the parameters and the utility of this layout method.
The pattern on the left here is not an 8 fold. Eight fold tapered rosettes are quite unusual. I used this space to include one more interesting demonstration of the deeper universality of this layout method. Make [a-g-b] a straight line and complete the resulting pattern. You may be surprised. The resulting pattern is at the very end of this discussion. Don’t peek before you draw it…

Layout 42
The two tapered rosettes, and some complications in the resulting polygons.

Layout 43
The last issue dealt with in the first course was a critical structure formed in this layout, minimal triangles and their relation to the developing pattern. This is a rich subject developed by Lee in his notebooks in relation to the interactions of multiple rosettes in more complex patterns. This is just a teaser and a small beginning on this subject. The deeper analysis of this will need to wait for more foundation work.
There is a huge amount of material to explored based on the life of study discussed by Anthony Lee in his notebooks. We will wander further afield as we develop certain specifics but his explorations form a good guide to the complex world of the Islamic Star patterns.
There is an unbelievably deep and broad world to explore here, all related to the methods and proportions that give us the rosettes. We will hope to see you in the next course.
Some Resources for the Study of Anthony J Lee’s Notes;
(1) tilingsearch.org has a permanent link to Lee's Notebooks. These notebooks are in pencil, in script. They are not particularly difficult to read, but it takes some work.
(2) Typed transcripts can be found Here. These are provided by AJ Lee and shared with permission. They are easier to read but the figures are not in line with the text.
(3). Some summaries extracted from the notebooks which are relevant to this part of the courses are available here. These transcripts have the figures in line with the text. Where we have needed to modify notation to be consistent over the course, redrawn figures are included.
(4) A.J. Lee, Islamic Star Patterns, Muqarnas, Vol. 4 (1987), pp. 182-197. A small fraction of the work found in the notebooks was condensed into a short paper in 1987. It is worth reading. The notation will not be identical to what is used here. The paper is available from Archnet here.
(5) AJ Lee has continued his study of the rosette to the present. Some newer thoughts will be found on the Facebook page “Analysis of the Arabian Geometric Patterns” by Ayman Soliman. He has written at least two short articles in collaboration with AJ Lee.

The answer to the teaser; what happens when [a-g-b] becomes a straight line. A perfect pattern of regular pentagons around a {10/3} star polygon results. This is an example of the several reasons to consider these proportions “ideal proportions” in the rosette. The proportions link to deeper relationships.
A similar pattern results from the 8 fold divisions. A bit of thought is required here since the initial pattern formed is a 16 point star. An 8 point star polygon is selected out to give this pattern.