Instruments: Bow Compasses
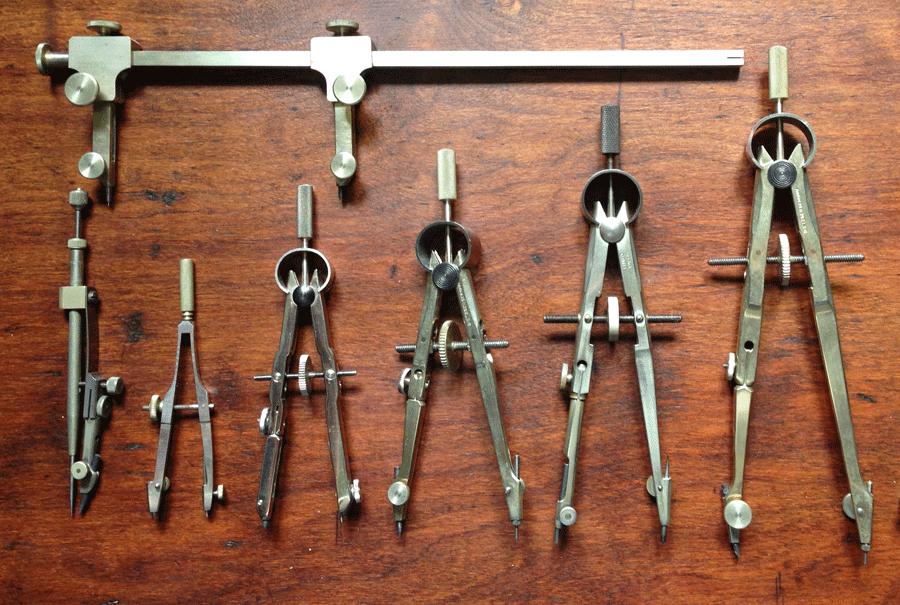
A Full Set of Drafting Compasses from the 1950 60s
Bow compasses are one of the foundation instruments of geometric drawing. Which of these, or how many of these, do we need for the type of drawing we will do? Why do I recommend what I recommend? This post will be about these spring bow compasses and we will leave beam compasses, drop compasses, quickset compasses, and specialist compasses for their own posts.
These two would be the best form of bow compass for geometric or technical drawing for a number of reasons. They were developed over several centuries for the task. Geometric or technical drawing has not changed much in those 500 or so years. The professional instruments developed by the 20th century for the task are still the best. The question addressed here is, how close can we get to the ideal solution in an affordable compass which is readily available. The answer is not simple.
What Makes the Best Compass Best?
Each of the features of the modern compass has a specific purpose.
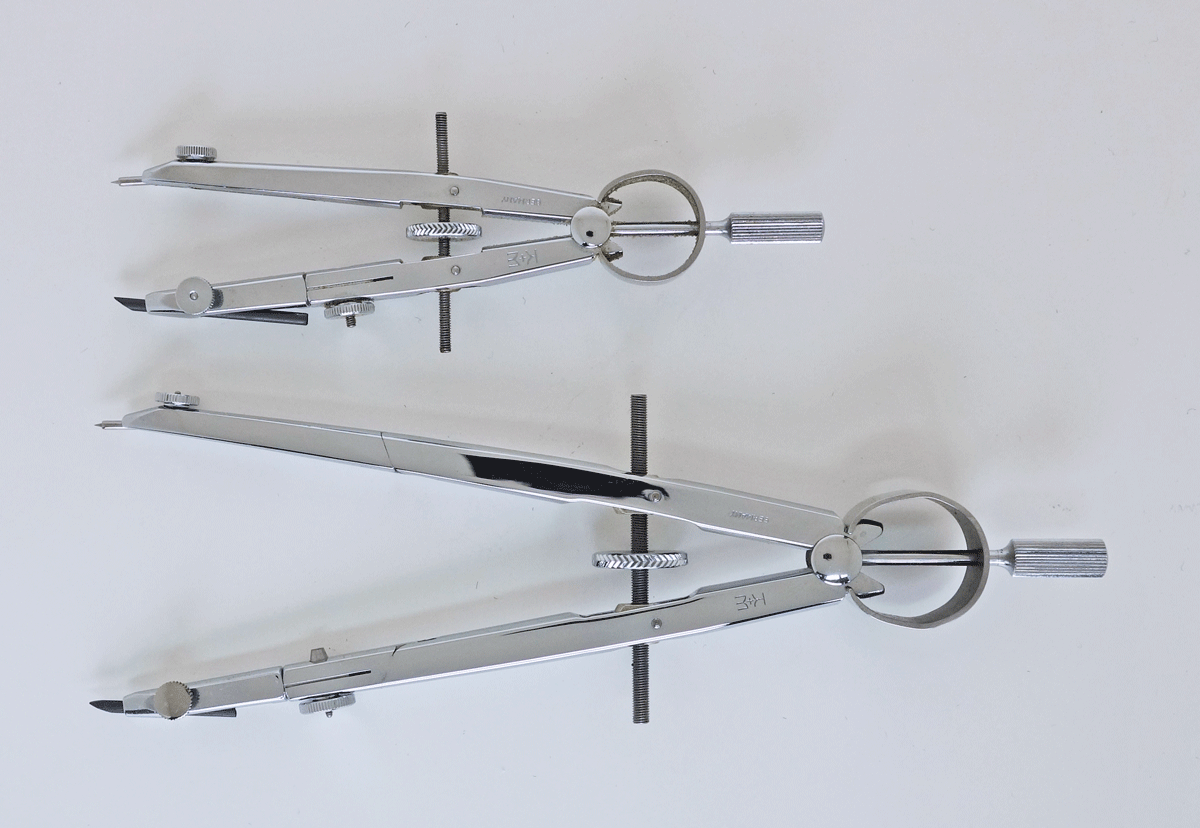
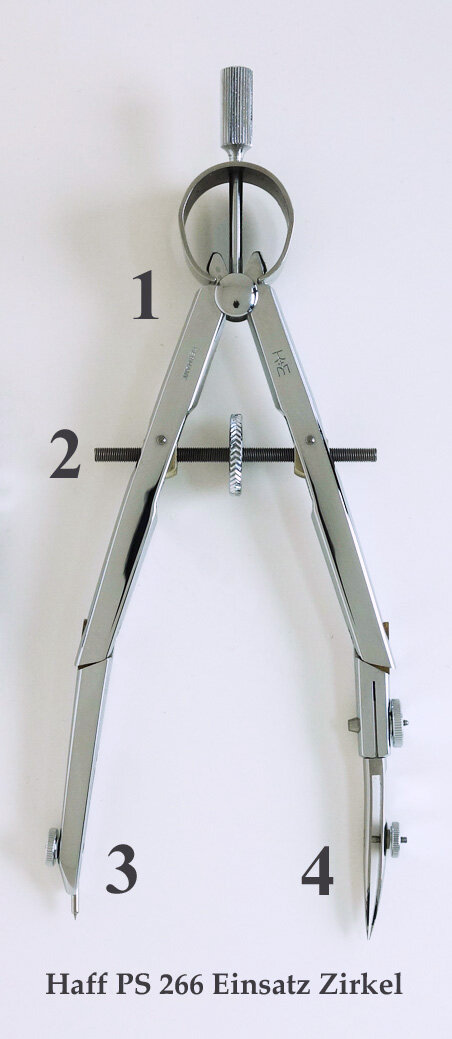
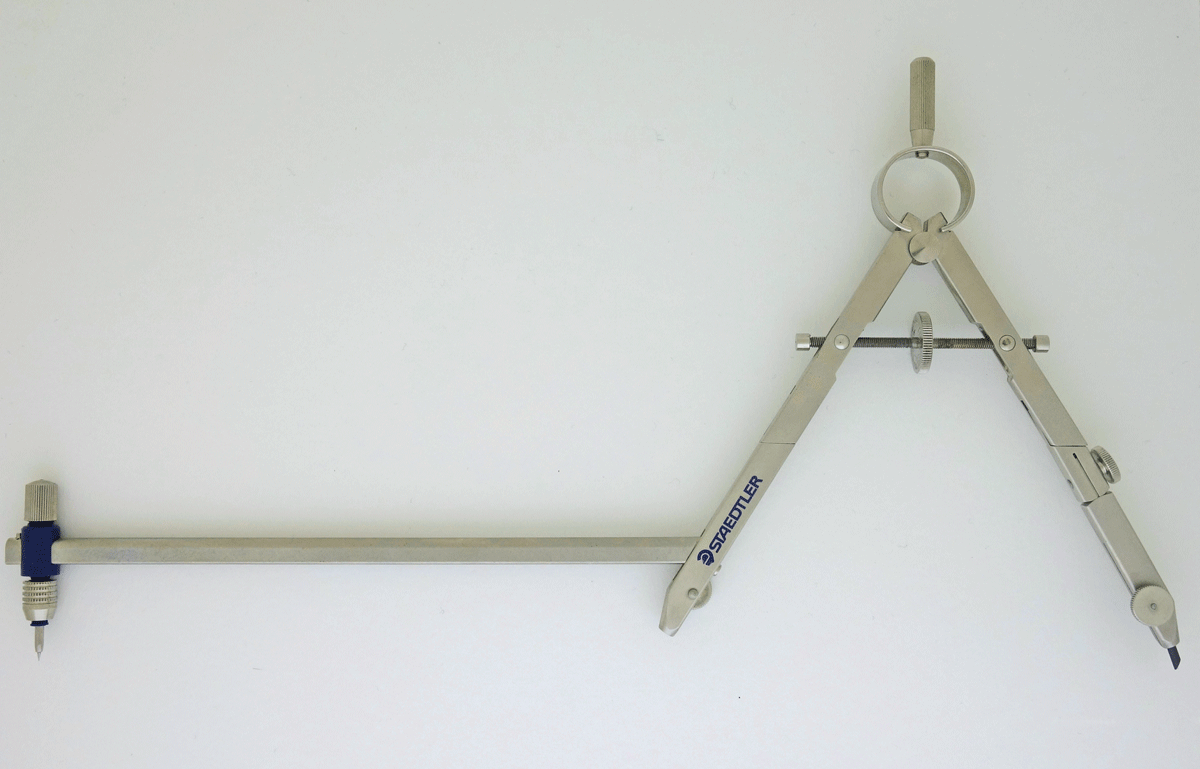
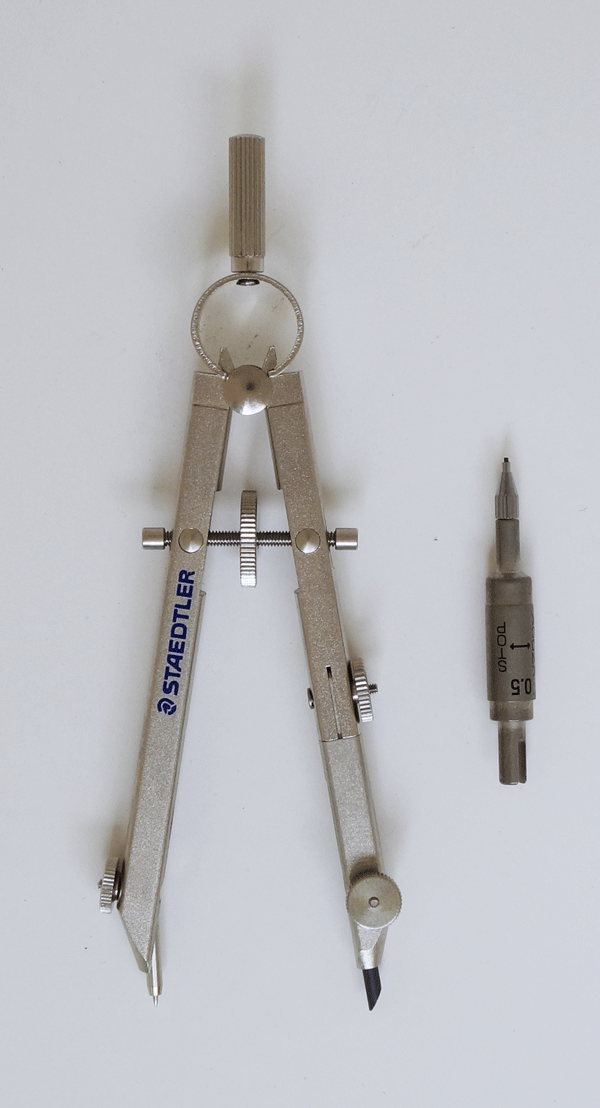
1) A stable head design. Most modern compasses have a problem here. This one is excellent. This spring head design goes with the screw adjustment.
2) Any compass is adjustable. Screw adjusted compasses are easier to learn to use and fastest. There are other options.
3) A good quality steel point and a method to keep it vertical.
A vertical point improves accuracy and avoids eating a hole in your paper.
4) An exchangeable leg allows use of a steel pen, a technical pen in an adapter, or if you must a mechanical pencil.
1 & 2) Most modern compasses are adjusted with a screw. This method has been around for 500 years and its advantages and problems are well known. On the plus side the screw adjustment is fast and accurate. A drawing student can learn to use it in a few minutes.
The problem is that no screw can be a prefect fit in its nut. There is some “play” in the nut. If you hold the legs of your compass at the bottom, they will move slightly in and out if pulled or pushed gently. You are not bending the leg, you are seeing the play in the screw and the head. This is the origin of the problem in the test shown on the “Drawing Instruments and Getting Started” post. Draw an arc with a very gentle outward pressure on the leg of the compass and a second arc from the same center with a very gentle inward pressure. They are seldom exactly the same in modern compasses. If this is excessive, or if the tension taking up the play in the screw is too soft, your drawings will suffer. The worst I have seen is 2mm movement.
The compass shown has a very strong spring forcing the leg out against the screw thread. It has essentially no movement under any reasonable pressure. It will draw a true arc even is used incorrectly.
The European Tradition
The compass above is the same design from the knuckles down, but the head does not require a spring. It has no adjustment screw. This design has not changed in over 100 years, as shown, because it works quite well. These are by far the most common compass designs in Europe. I will cover them in a post on “Simple compasses”.
3 & 4) The last two features to look for evolved mostly from the simple compasses above and inking compasses but they are also needed in pencil drawing for different reasons.
Steel pens (shown) or technical pens must be vertical or they will not work well, or at all. This is the reason for the “knee” or “knuckle” in the compass leg. Every opening of the compass will require a different set of the knuckle to give a vertical pen.
If you look at the simple compasses above, it is also obvious that there is nothing keeping the legs from spreading but the friction in the head. If the legs are left straight, there is a significant outward pressure on the leg when drawing with a lead that tends to disturb your radius setting. Setting both the steel point and the drawing point vertical means that there is no outward load on your compass legs.
This is normally not a problem with a pencil lead in a screw adjusted compass If your compass is well made you can ignore it.
The second knuckle, at (3), is used to keep the steel point vertical. This has a couple of virtues. Most important in practice is that the steel point eats a hole in your paper if it is significantly angled. Irritating to be sure. The other points are for ease of use. It is easier to swing the compass if the point is vertical and it is less likely to skid.
There are two ways to set the steel point vertical. The knuckles shown above, or a needle shoe shown here. Needle shoes are less prone to wear than knuckles but they are a bit difficult to tighten well due to the small nut.

A Needle Shoe
This solution is used in a few modern designs.
It works well
What is available on the market today?
The compass recommended at the top of the page is no longer available new (Jan. 2022). It was made by Gebrüder Haff but they ceased production of instruments decades back. There are a few options for good quality bow compasses in current production.

Mars Staedtler 551 02 Comfort Bow Compass
A good quality compass still in production. Why do I recommend it?
- A good stable head design
- Good adjustment precision
- A good Needle Shoe design
- A decent pen adapter
- A usable Extension bar
The Manufacturer’s link for this compass; Mars/Staedtler
Prices about $30-40
London Graphic Center £ 38
This compass and the following examples have an extension bar. I don’t like these for some specific reasons but I will comment on them below as a group.
There have been some reports of problems with this Staedtler compass so I will take the opportunity to comment on a fix here. Some people report that the screw adjustment is too loose, it does not hold a radius. If you get one new, send it back for a replacement. If a compass develops this problem, the traditional solution is to wax the screw with beeswax. This makes a tight screw run smoother and it makes a loose screw more stable. If beeswax is unavailable, hard paraffin wax works almost as well.
I have not seen this problem personally so it may not be common.

ECOBRA Large Combination Bow
I have not tested this compass personally.
I would worry about durability due to more plastic parts compared to the Staedtler.
I am never comfortable recommending an extension bar system until I have tested it.
The manufacturer’s site for this compass;
ECOBRA compasses are retailed by Alvin in some countries. Prices vary

Jakar 1156
This compass may no longer be available but I include it here since it may still be in the shops.
This compass is shamelessly copied form the Staedtler Comfort bow series and has a number of nice features as a result.
One of those is the extension bar design which I will mention below.
It has change the spring head design to an inferior design, but it is not the worst I have seen. It is usable.
QuickSet or SpeedBow Compasses.
All of these are usable and I would vastly prefer them to the most common 6 inch design, the Quickset compasses. I did not find any of the currently produced examples I tested to be truly acceptable. All of them were too loose in head design and prone to radius errors. If you must have one, the Mars Staedtler 555 was the only marginally acceptable example.
(Technical minutiae; This is due to use of helical cut gears in the head design.)
All of the other Mars Staedtler Quickset compasses were significantly worse.
There are acceptable, in fact excellent, Quickset compasses but they belong to a particular family of compasses. See Instruments: Wing Compasses.

Mars Staedtler 555 Quickset
If you must, this was the best Quickset of the set I tested.
It tends to be fairly expensive.
The adapter on the bottom right is a ball joint adapter for a technical pen only. It cannot take a pencil
The Universal adapter on the left is usable but not the best. These adapters will have their own post.
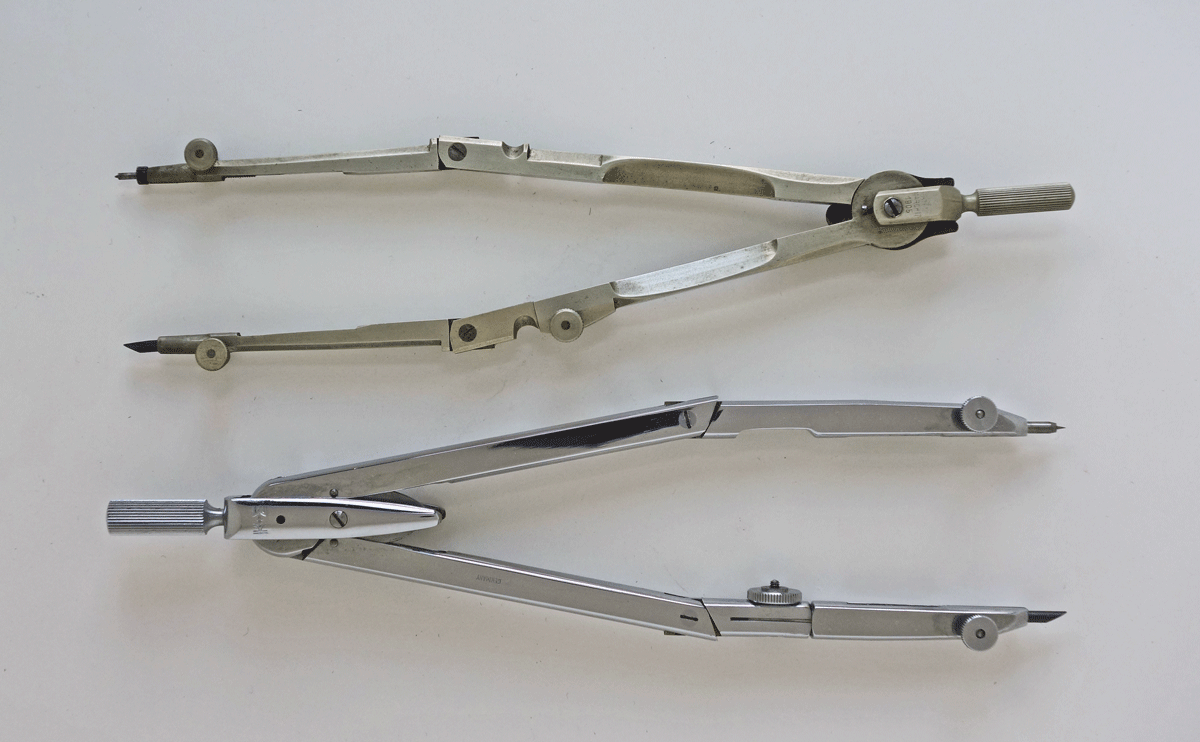
Extension Bars
I mentioned twice that I don’t like these. I recommend that you buy a beam compass. But, if you have an extension bar and you have trouble getting a beam compass here is what you need to know.
A correctly set up Extension bar.
This is the best design of extension bar, correctly set up for the maximum radius. Extension bars are awkward since you really should not be holding the compass except by the finger post at the top. This can be a real problem with extensions. This extension design slips into a tight slot on the steel point leg of the bow. It puts a new steel point on the extension bar and uses the compass opened up to make the extension parallel to the paper. You now set your radius about 1 mm larger than desired by sliding the steel point carrier on the bar. The last 1 mm is adjusted by the screw adjustment. The set up is reasonably easy to use since your finger post is out by the lead on the radius. This is an acceptable design compromise found on several of the Masterbow series from Staedtler and the Jakar 1156. The Masterbow series is out of production but very common used.

The Most Common, and Most Awkward Extension Design.
This design is, unfortunately, more common. The pencil arm of the compass is removed and the extension bar inserted. The compass is adjusted to make the bar parallel to the paper. The steel point should be about vertical so that you don’t need to use the knuckle. This is very awkward to use since your fingers belong on the finger post. You are trying to swing the pencil point at the end of a long arm from almost the center of a long set up. An additional problem is that these are often not a good fit. They wobble. All in all, this is not a good solution to the problem.
The Staedtler 551, sadly, also uses this design. It is worth looking for the older 551 02 Masterbow. I will have more to say on that below.

Why So Many Sizes?
One question remains regarding bow compasses. Why are there some any sizes, and how many do you really need? The answer is largely about two things. It is hard to design a compass that will swing easily and allow the steel point to stay vertical over a very large range of openings. It is very awkward to swing a 6 inch compass on a 4 mm radius. It can be done, but it is not the best solution. The compasses on the bottom row above are; drop or pump compass, 2 Inch bow compass for radii down to 1.5 mm, and a series of 4 indexed bow compasses for radii from about 8 mm to 80 mm.
Drop compasses are not designed to draw small radii well. They are designed to be fast. The 2 inch spring bow is the better solution for small radii and perfectly capable below 1.5 mm radii. Any of the smaller compasses do need to be set up properly for small radii. The lead and needle need to be set to the same extension. This is important in lead point drawing and critical in inking with small compasses.
Notice that these Dietzgen bows do not have knuckles in the steel point leg. Knuckles wear reasonably rapidly, and they are expensive to make. It was easier for a working draftsman to have a complete set shown.
That solution is a little expensive for an artist. How many, and which do you really need?

6 and 4 Inch Keuffel & Esser (Gebrüder Haff)
As shown above, I recommend adding a 4 inch bow compass. These are usable down to 1.5 mm radius but you will need to practice. For small circle compasses of all kinds, the last thing you do is check that the steel point is even with the lead point. If it will sink in the paper, leave it very slightly longer than the lead. The comfortable upper end of the range for the 4 inch compass is about 25 - 30 mm radius. This covers your small circles and medium circles into the comfortable range of your 6 inch compass. If were only allowed two compasses, I might buy a 4 inch and a 7 inch beam! The same story applies to where to buy one. Professional instruments are no longer made. The two above are still common used but they will be less common in the coming years.
Staedtler 4 Inch Bow
This is actually a bit small for a 4 inch but it is still available new.
You will probably need to buy a set from Japan to get this one. A plus is that it comes with the rather nice mechanical pencil leg if you really want to use a mechanical pencil in your compass.
Look for one on amazon.com
There is a better solution if you are willing to look for a used instrument set. The previous Staedtler 4 inch bow design was quite good and it can be fairly easy to find. What I am recommending in these posts is simply the bow compasses of the basic “Detailer’s Case”. “Detailer” is a specific job description in the drafting shop. These sets are extremely common used since they are the “correct” answer for what you need for geometric or technical drawing.
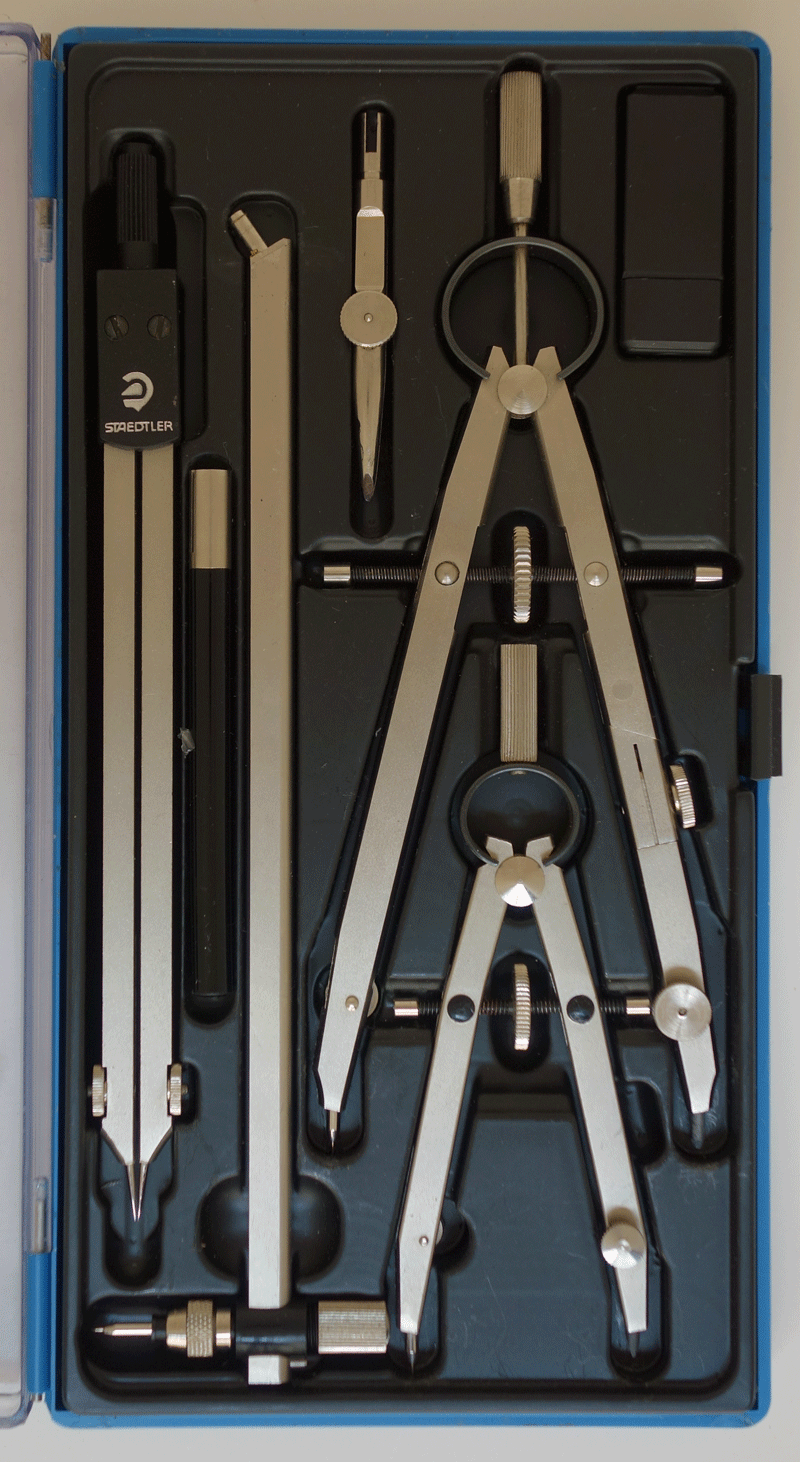
The Mars Staedtler Masterbow Detailer’s Set
These Detailer’s Cases contain exactly what I recommend here. Note that it has the preferred, easiest to use, design of extension bar which replaces the steel point. These are usually found in excellent condition for about $30.
This is the currently best way to find a 4 inch compass.
If you already have a 6 inch compass, this one is probably as good or better.
There are usually several of these listed on ebay for $30 or less on any given day.
As of 2020 nobody manufactures professional quality drawing instruments new. There is simply no market. Student’s “geometry” compasses are usually appallingly poor quality. By far the best source of quality instruments is used professional instruments. The market is awash with them just now so I would buy now.
If you buy the best maker’s best instruments you will usually find them to be well cared for and in excellent condition. These best quality instruments are not the instruments a draftsman buys first. I could never afford them when I was working as a draftsman. First quality instruments were sold by Keuffel & Esser (USA), Gebrüder Haff (Germany), Riefler (Germany), Kern (Switzerland) and several smaller retailers in the UK. Less expensive professional instruments which have often seen more use were sold by Dietzgen (USA) and ECOBRA (Germany).
Most firms were not makers, they were retailers. Many quality instruments were sold under other trade names. Since they did not make their instruments, quality varied. Quality of Rotring compasses, for example, varies from excellent, made by Gebrüder Haff, to horrible. Koh-i-Noor / Rapidograph also retailed Gebrüder Haff instruments, as another example. This makes these brand names very difficult to recommend.
If you are patient you can find excellent instruments for excellent prices. The ideal set you want is the master detailer’s set below, if your budget permits it. These are becoming uncommon. With patience they can be had for less than $75. Pries range up to $450. For what you are buying, anything under $100 is a very good price. That is just a bit more than the price of one “not very good” quickset compass. They do come up for sale but you will need to look. Mike Wyndham in Canada, @mike.wyndham, is a good person to know if you are in the market for fine instruments. I still have some and you can contact me.

It is still quite possible to find excellent quality instruments for very little money on ebay. The total price, including taxes and shipping for BOTH of these sets was $31 in June 2020. If you decide to go this route- Good hunting!
